调整图像大小是一项看似简单,实则难免会遇到的编程任务。一个常见的错误是忘记处理 EXIF 方向,这会导致调整后的图像看起来与原始图像大相径庭。
去年我编写了一个create_thumbnail工具来调整图像大小,今天我发布了一个小更新。现在它可以识别 EXIF 方向,并且不会再损坏这些图像。这要归功于新版本的 Rust image包,它刚刚改进了对 EXIF 的支持。
EXIF 方向是什么?
图像可以在其 EXIF 元数据中指定方向,该元数据可以描述旋转和反射。此类元数据通常由相机和手机添加,它们可以检测您的握持方式,并指示查看软件稍后如何显示图片。
例如,如果您侧握相机拍照,相机会记录图像在观看时需要旋转 90 度。如果您使用前置自拍相机,相机会记录照片需要镜像。
EXIF 方向有八个不同的值——以 90° 为增量旋转,以及镜像或不镜像。默认值为“1”(按原样显示),其他七个值如下:
1 6 8 3 2 5 7 4 该图显示了单词“FLY”的八种不同方向:四次旋转、四次镜面反射旋转。
您可以使用Phil Harvey 的 exiftool等程序查看 EXIF 方向值,该程序有助于将数值转换为人类可读的描述:
$ # exiftool's default output is human-readable $ exiftool -orientation my_picture.jpg Orientation : Rotate 270 CW $ # or we can get the raw numeric value $ exiftool -n -orientation my_picture.jpg Orientation : 8在 Rust 中调整图像大小$ # exiftool's default output is human-readable $ exiftool -orientation my_picture.jpg Orientation : Rotate 270 CW $ # or we can get the raw numeric value $ exiftool -n -orientation my_picture.jpg Orientation : 8
我使用image箱在 Rust 中调整图像大小。
我以前调整图片大小的代码是打开图片,调整大小,然后保存回磁盘。这里有一个简短的例子:
use image :: imageops :: FilterType ; use std :: error :: Error ; fn main () -> Result < (), Box < dyn Error >> { // Old method: doesn't know about EXIF orientation let img = image :: open ( "original.jpg" ) ? ; img .resize ( 180 , 120 , FilterType :: Lanczos3 ) .save ( "thumbnail.jpg" ) ? ; Ok (()) }缩略图将保持调整大小后的像素顺序与原始图像相同,但缩略图不包含 EXIF 方向元数据。这意味着,如果原始图像具有 EXIF 方向,缩略图的外观可能会有所不同,因为它不再被正确旋转/反射。use image :: imageops :: FilterType ; use std :: error :: Error ; fn main () -> Result < (), Box < dyn Error >> { // Old method: doesn't know about EXIF orientation let img = image :: open ( "original.jpg" ) ? ; img .resize ( 180 , 120 , FilterType :: Lanczos3 ) .save ( "thumbnail.jpg" ) ? ; Ok (()) }
当我编写create_thumbnail时, image crate 对 EXIF 方向一无所知——但上周发布的v0.25.8 版本添加了几个与 EXIF 方向相关的函数。具体来说,我现在可以读取方向并将其应用于图像:
use image :: imageops :: FilterType ; use image ::{ DynamicImage , ImageDecoder , ImageReader }; use std :: error :: Error ; fn main () -> Result < (), Box < dyn Error >> { // New methods in image v0.25.8 know about EXIF orientation, // and allow us to apply it to the image before resizing. let mut decoder = ImageReader :: open ( "original.jpg" ) ? .into_decoder () ? ; let orientation = decoder .orientation () ? ; let mut img = DynamicImage :: from_decoder ( decoder ) ? ; img .apply_orientation ( orientation ); img .resize ( 180 , 120 , FilterType :: Lanczos3 ) .save ( "thumbnail.jpg" ) ? ; Ok (()) }缩略图仍然没有任何 EXIF 方向数据,但像素已重新排列,因此调整大小后的图像看起来与原始图像相似。这正是我想要的。use image :: imageops :: FilterType ; use image ::{ DynamicImage , ImageDecoder , ImageReader }; use std :: error :: Error ; fn main () -> Result < (), Box < dyn Error >> { // New methods in image v0.25.8 know about EXIF orientation, // and allow us to apply it to the image before resizing. let mut decoder = ImageReader :: open ( "original.jpg" ) ? .into_decoder () ? ; let orientation = decoder .orientation () ? ; let mut img = DynamicImage :: from_decoder ( decoder ) ? ; img .apply_orientation ( orientation ); img .resize ( 180 , 120 , FilterType :: Lanczos3 ) .save ( "thumbnail.jpg" ) ? ; Ok (()) }
以下是三张图片的视觉对比。请注意,旧代码中的缩略图看起来是颠倒的:
 原始图像 原始图像 |
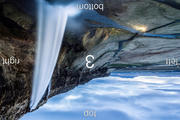 旧代码的缩略图 旧代码的缩略图 |
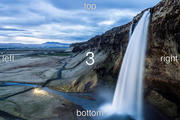 新代码的缩略图 新代码的缩略图 |
该测试图像来自 Dave Perrett 的exif-orientation-examples repo ,其中收集了一些对测试此代码非常有帮助的图像。
这重要吗?
这只是一个小小的改动,但它解决了我在每个处理图像的项目中都会遇到的一个烦恼。我已经写了这个修复程序,但是带有 EXIF 方向的图像非常少见,以至于每次开始一个新项目时我总会忘记它们——而且我以前总是一次又一次地解决同样的问题。
通过在create_thumbnail中处理 EXIF 方向,我就不用再考虑这个问题了。这就是共享工具的魅力所在——我修复一次,所有当前和未来的项目都会修复。
[如果这篇文章的格式在你的阅读器中看起来很奇怪,请访问原始文章]
原文: https://alexwlchan.net/2025/create-thumbnail-is-exif-aware/?ref=rss